CertFlow helps certification sales teams collect a customer opportunity, choose likely service areas and markets, record evidence, and prepare a specialist handoff. Its companion CertPrepare, also called CertPrep, analyzes product photos to help with the first customer conversation. Open CertFlow or CertPrepare. This guide covers both apps, including scan history, editing, transfers and administration.
| At a glance | Details |
|---|---|
| Best for | Sales representatives, account teams and specialists gathering a certification brief |
| CertFlow access | Browser; no account required |
| CertPrepare access | Google sign-in; internet connection for scanning and saved history |
| Devices | Desktop and mobile browsers; both apps offer an installable web app |
| Workspace storage | One opportunity in this browser; text, selections and filenames persist locally |
| Photo-assistant storage | Processed photos and scan results are sent to the server and saved to the account; administrators can manage them |
| Meaning of results | Preliminary discovery and handoff guidance; the score and estimated hours do not establish compliance or a quote |
Choose a starting point
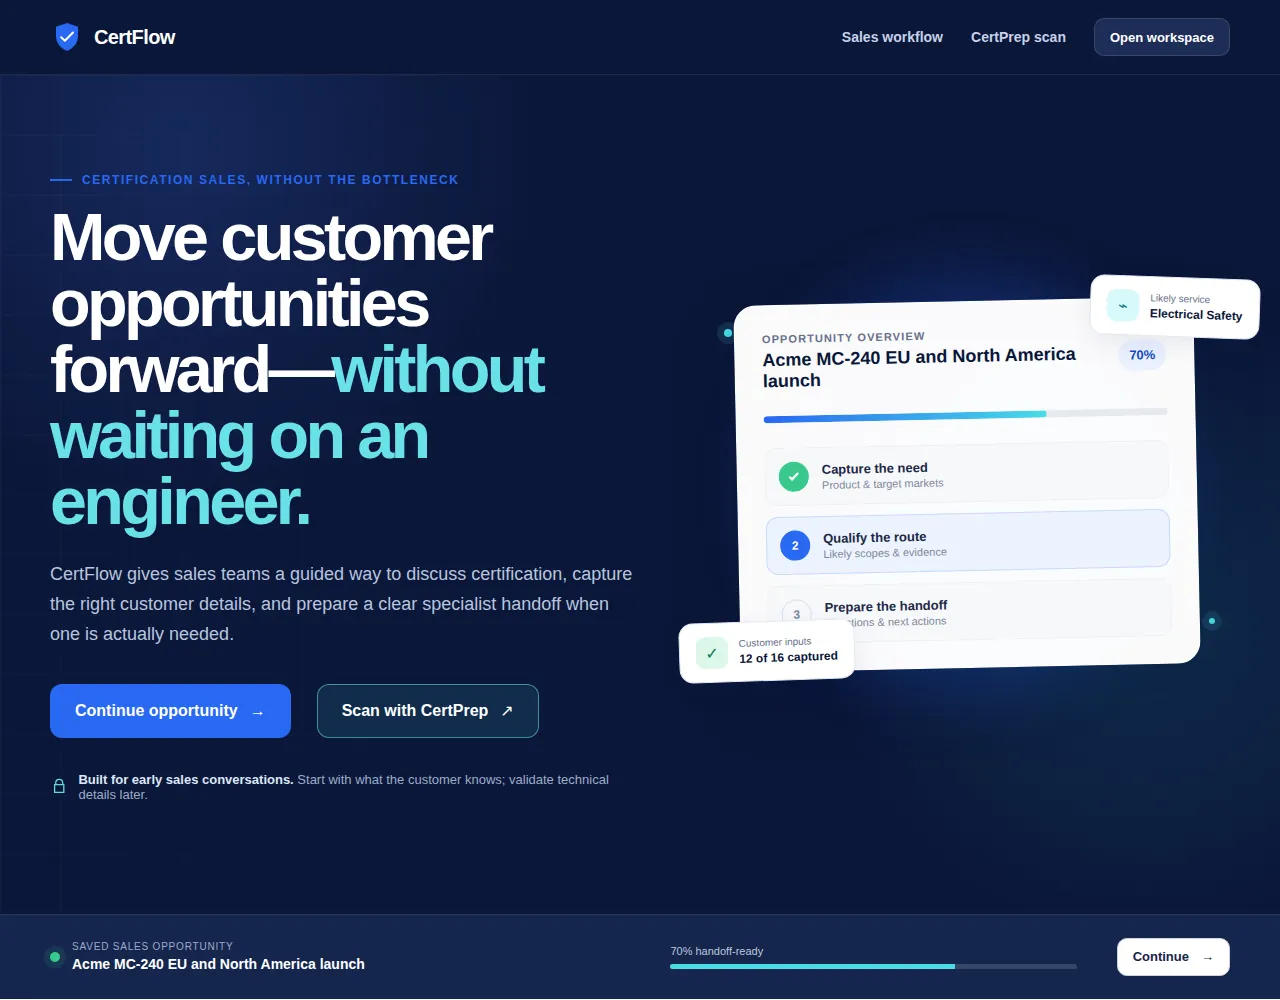
Use Open sales workspace when you already have a customer conversation to record. If a draft exists, the landing action becomes Continue opportunity and a resume card shows the current opportunity. Open workspace in the header returns to the same draft. Sales workflow explains the process on the landing page.
Use Scan with CertPrep or CertPrep scan when the customer has sent photographs. You can scan first and then enter the findings in the workspace, but these are separate tools: a scan does not automatically fill the six-step opportunity form.
All screenshots below show isolated test instances with fictional accounts, product photos and customer details. Photo-analysis replies were simulated for the walkthrough; they demonstrate the real interface, not a real assessment of a product. Existing CertFlow promotional material is a video composition project; no rendered video was present in the reviewed repository, so this page does not present that project as a playable tutorial.
Create and navigate an opportunity
- Open Open sales workspace.
- Enter Opportunity name and Product name. Both are required to continue from the first step.
- Complete the remaining fields while the customer details are fresh.
- Choose Continue to move forward. ← Back returns without clearing your entries.
- Select a step directly in the sidebar or the numbered strip on phones to revisit it.
The six steps are Opportunity, Scopes, Markets, Product views, Evidence and Handoff. Scope and market steps each require at least one selection for Continue. Missing requirements show Complete the required selection. You can still navigate with the step bar to review other sections.
The percentage at the top updates as you fill the brief. It measures recorded completeness. Selecting a filename or changing a status can increase it without any independent verification of the content.
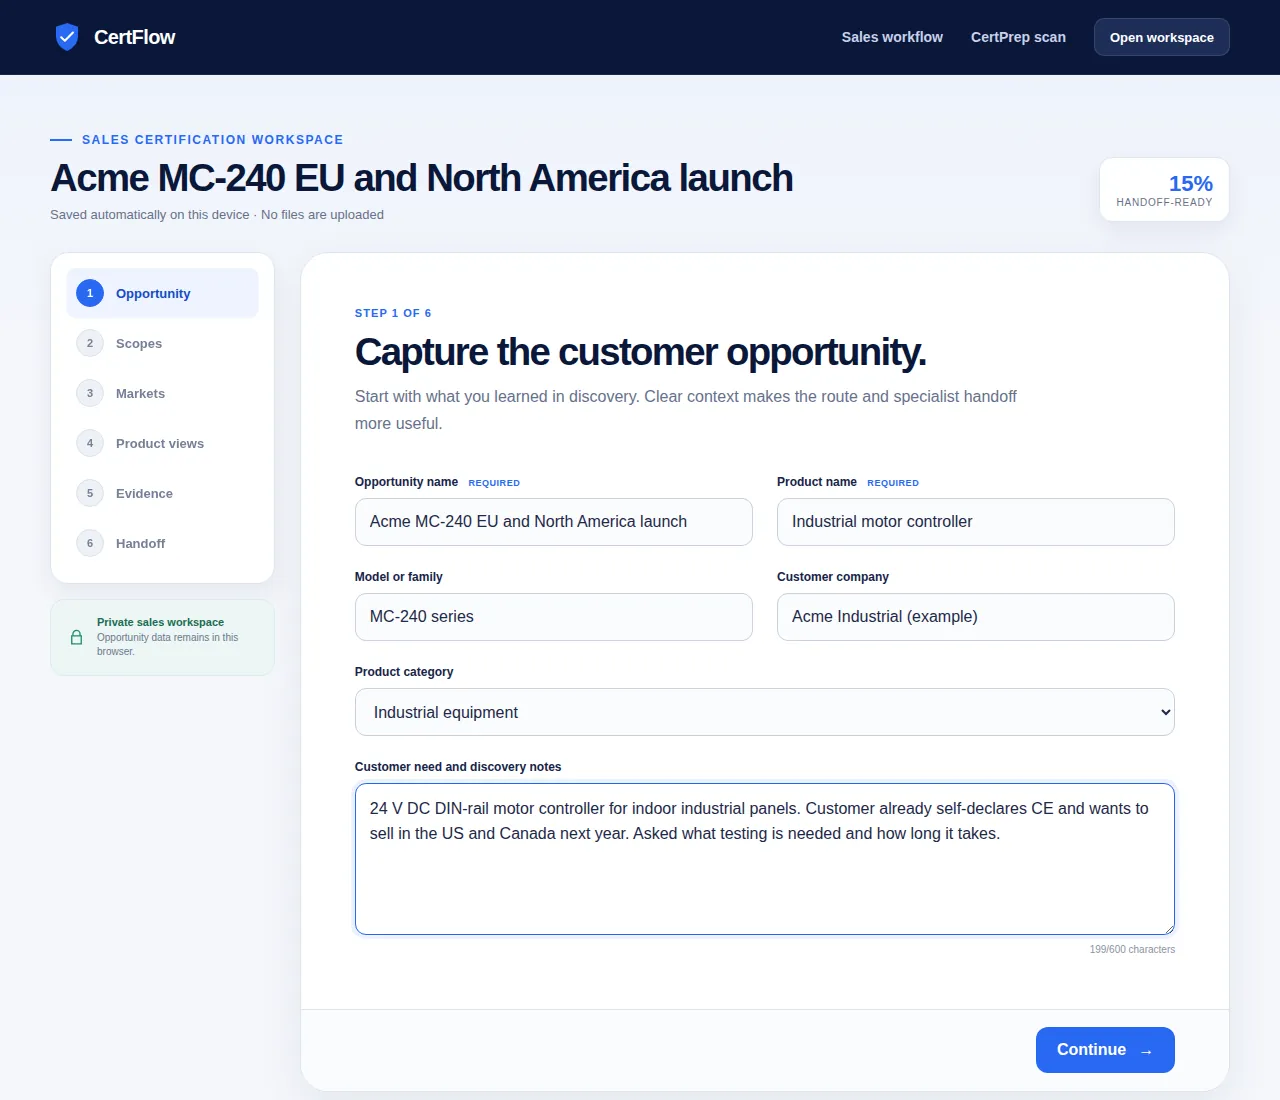
Record the product and customer context
| Field | What to enter |
|---|---|
| Opportunity name | A useful brief title, such as “Acme controller EU launch” |
| Product name | The actual product being discussed |
| Model or family | Model identifier and any variants covered by the request |
| Customer company | The manufacturer or customer organization |
| Product category | Industrial equipment, Consumer electronics, Information technology equipment, Medical device, Radio / wireless product, Protective equipment or Other |
| Customer need and discovery notes | Intended use, installation, environment, electrical supply, existing approvals, requested countries, and the customer's commercial question |
The six fields together contribute the opportunity portion of the score. Completing only the two required fields lets you proceed, but leaves the brief less useful. There is no separate customer database or account synchronization for this workspace.
Select the likely certification scopes
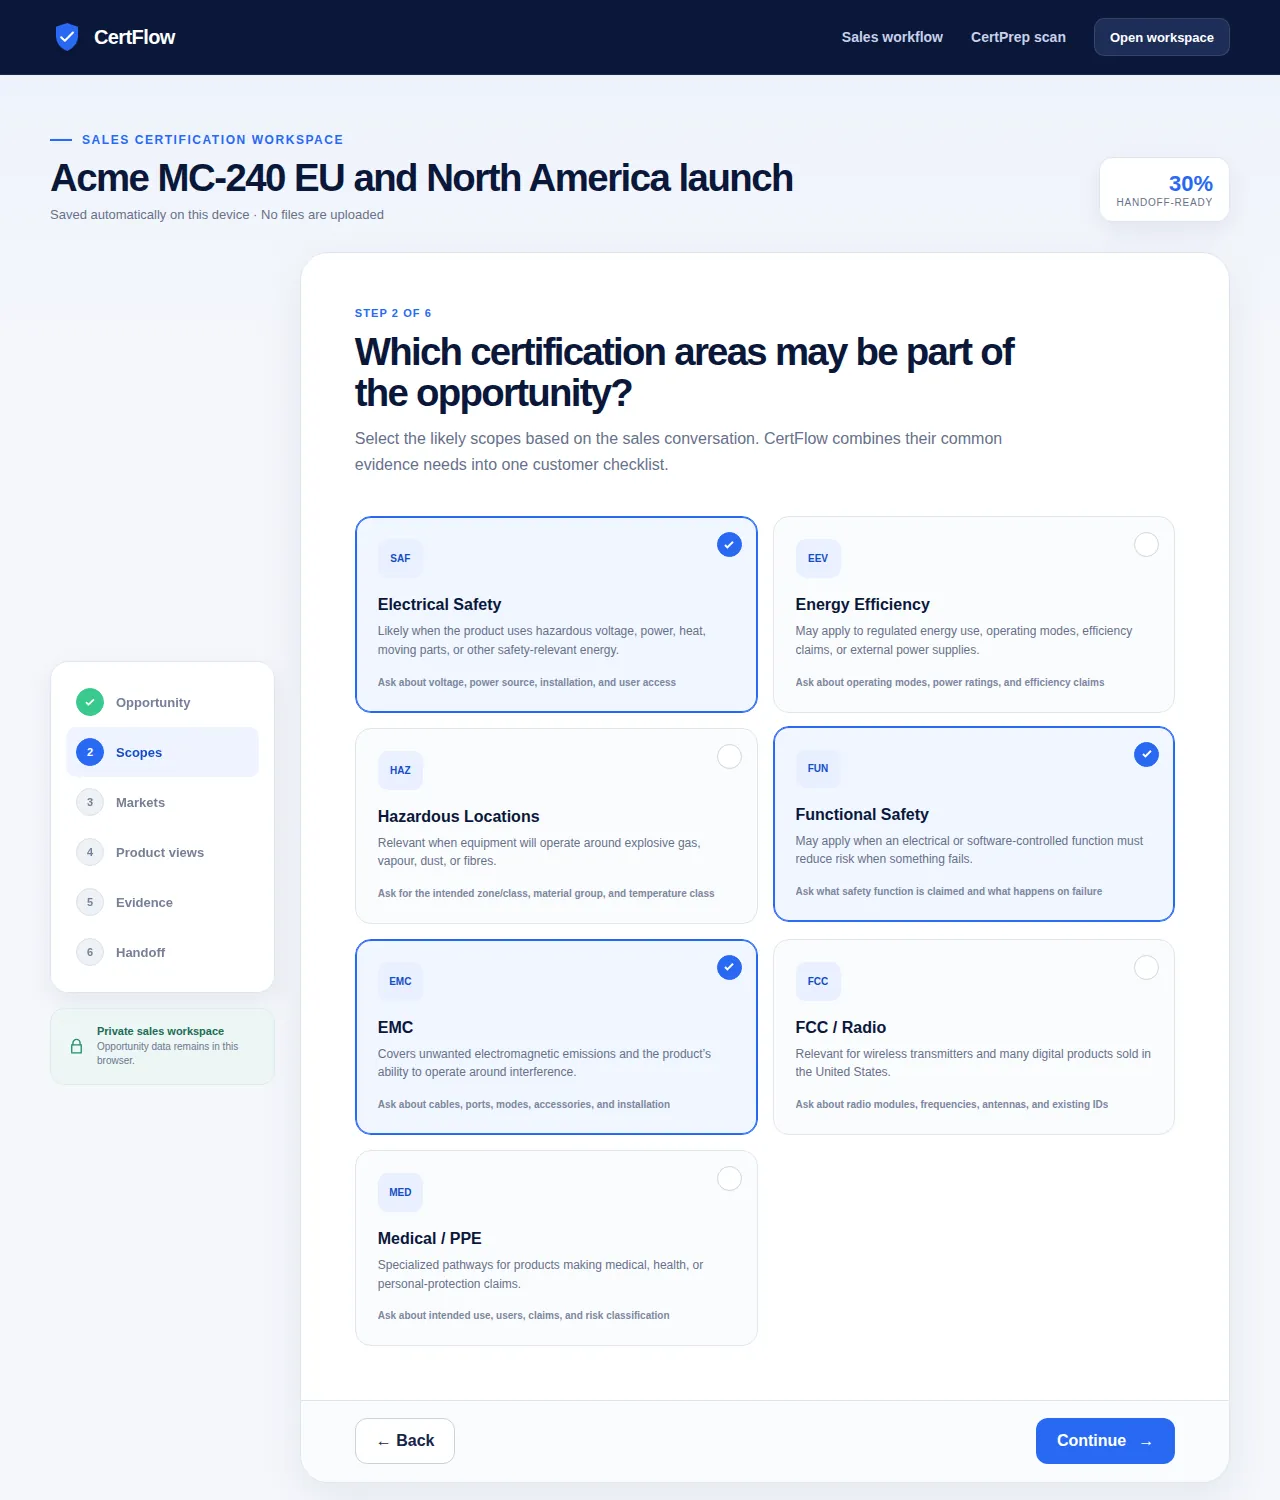
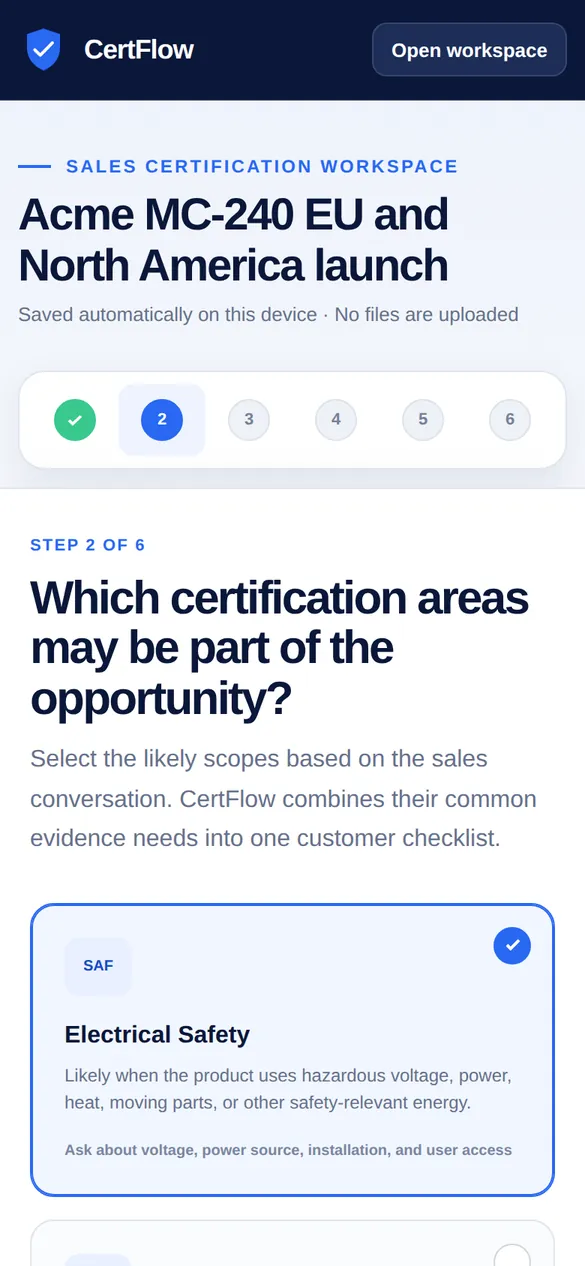
Select each relevant card under Which certification areas may be part of the opportunity? Select it again to remove it. Multiple scopes combine their recommended evidence into one checklist without duplicate items.
| Card | Discovery questions suggested by the app |
|---|---|
| Electrical Safety | Voltage, power source, installation and user access |
| Energy Efficiency | Operating modes, power ratings and efficiency claims |
| Hazardous Locations | Intended zone or class, material group and temperature class |
| Functional Safety | Claimed safety function and what happens on failure |
| EMC | Cables, ports, modes, accessories and installation |
| FCC / Radio | Radio modules, frequencies, antennas and existing IDs |
| Medical / PPE | Intended use, users, claims and risk classification |
These are prompts for a conversation. Recording a likely scope does not confirm that a particular standard or approval applies. Changing the selection can change both the recommended evidence and the percentage, because the checklist denominator changes.
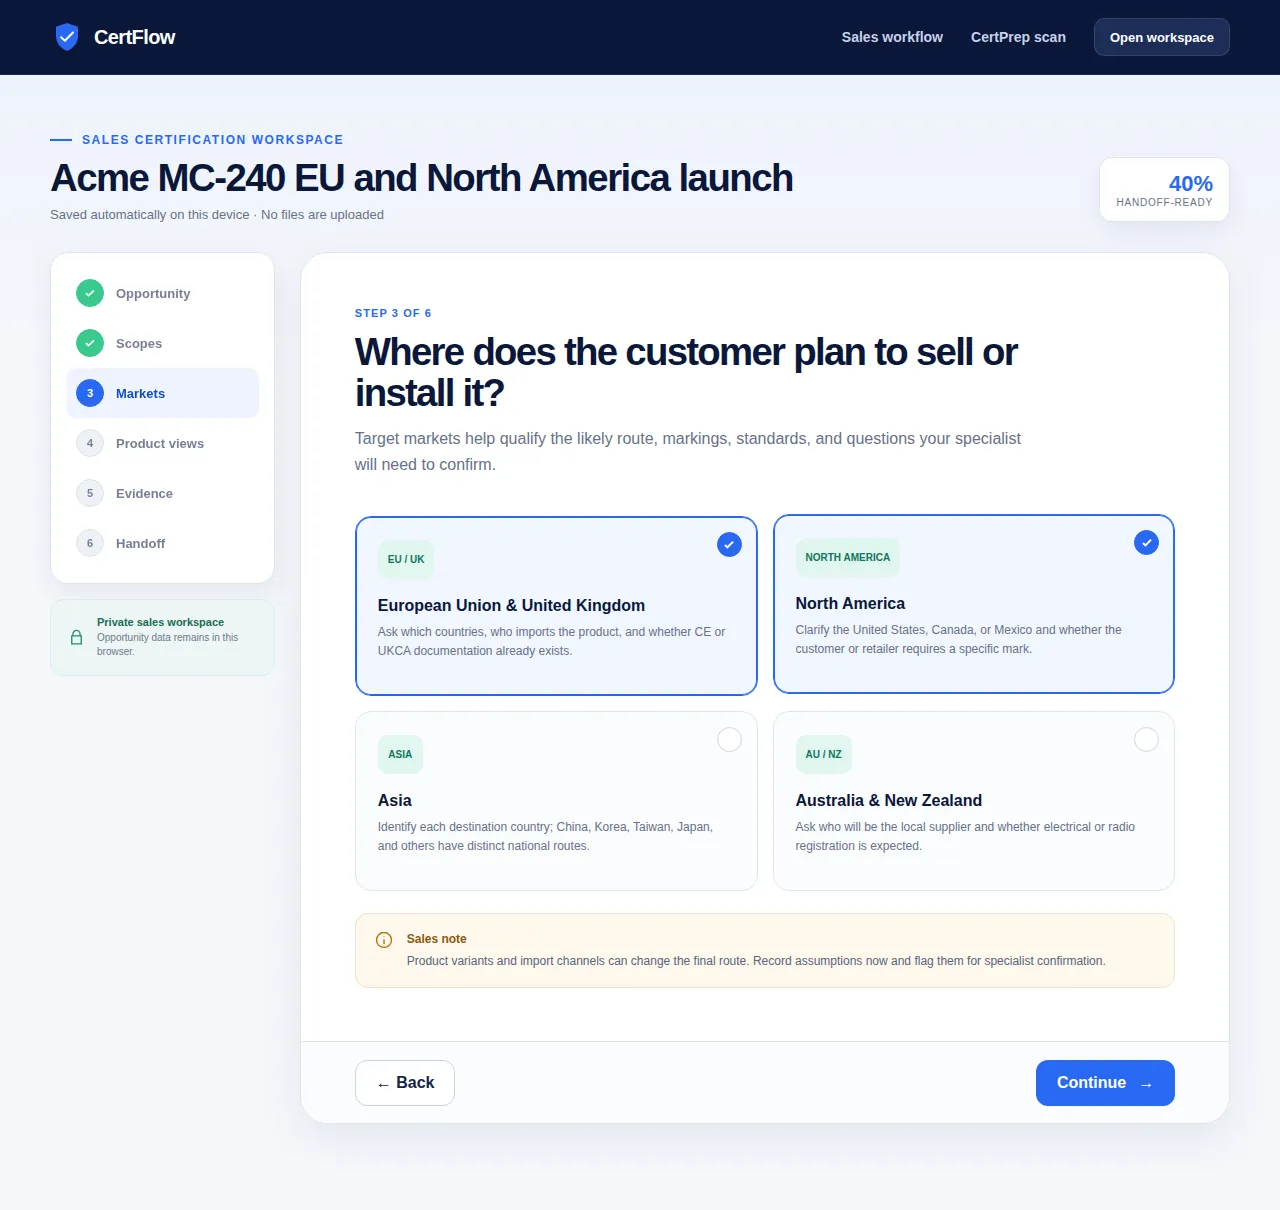
Choose the target markets
- Open Markets.
- Select all regions where the customer intends to sell or install the product.
- Put precise countries, importers, requested marks and assumptions in the discovery notes on Opportunity.
- Continue to Product views.
| Market card | Detail to clarify with the customer |
|---|---|
| European Union & United Kingdom | Countries, importer and any existing CE or UKCA documentation |
| North America | United States, Canada or Mexico; any particular customer or retailer mark |
| Asia | Individual destination countries rather than treating Asia as one route |
| Australia & New Zealand | Local supplier and expected electrical or radio registration |
There is no separate market-notes form in this step. The region cards guide the conversation; the opportunity notes hold the details.
Add, replace and remove product views
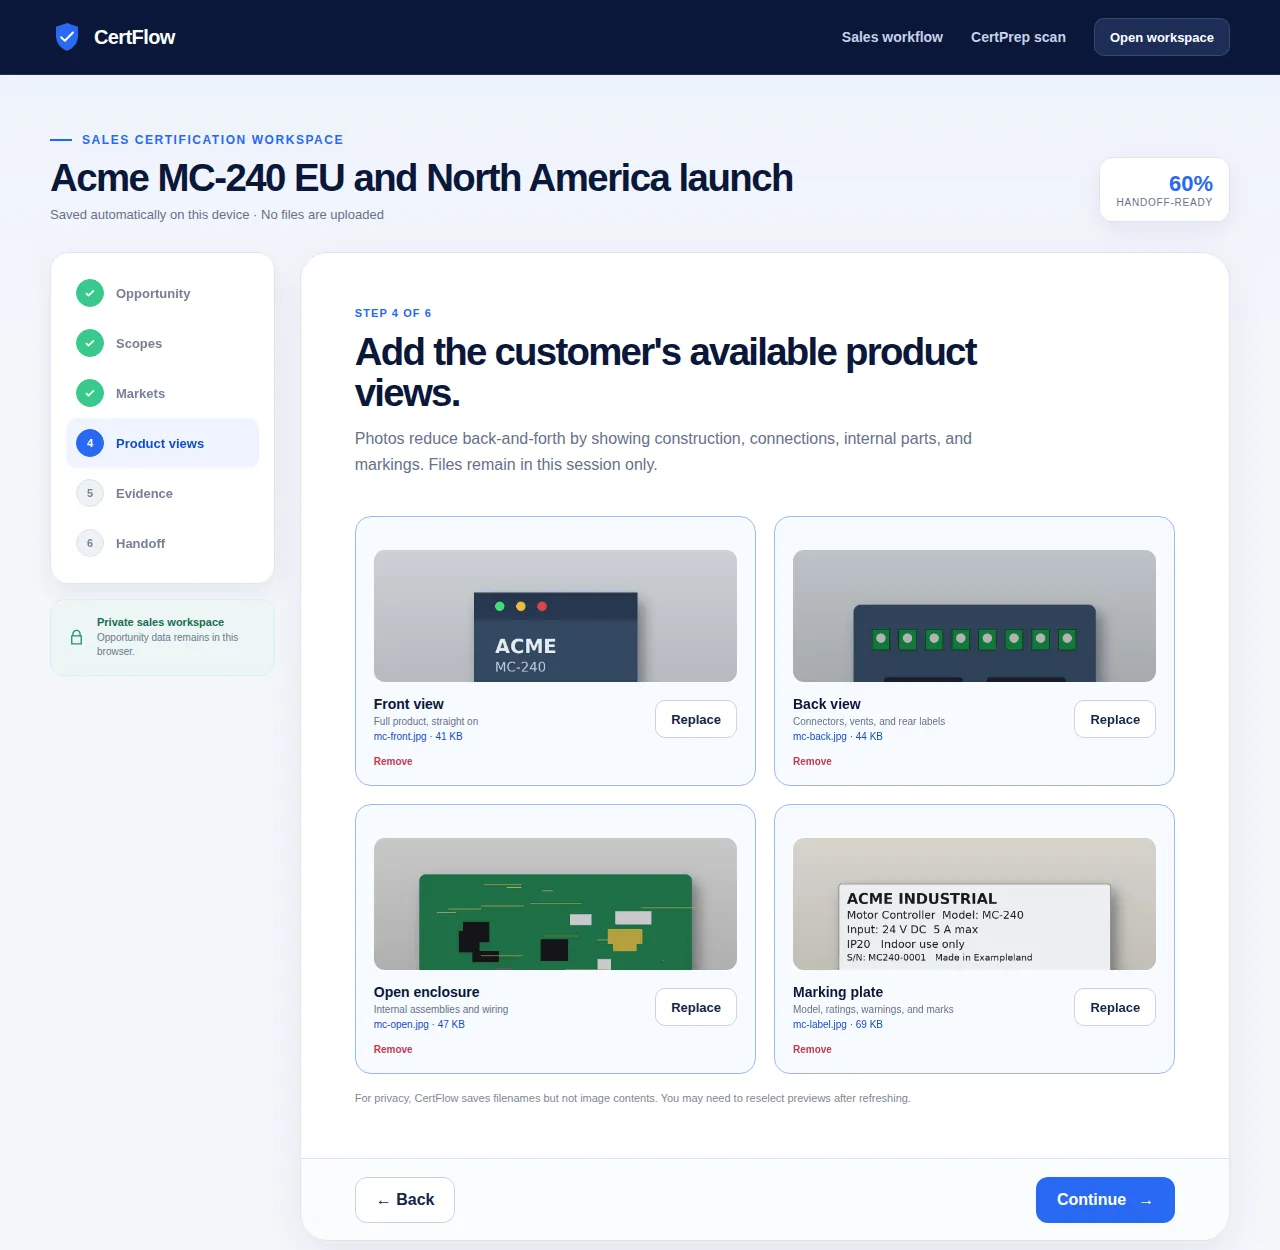
The four slots are Front view, Back view, Open enclosure and Marking plate.
- Choose the upload control in a slot and select the matching picture.
- Check its preview and filename. The marking plate should make ratings, model and warnings readable.
- Choose Replace to select a different picture, or Remove to clear the slot.
- Repeat for the views the customer has supplied; you can continue with missing views and ask for them later.
Each filled slot contributes five percentage points, for a maximum of twenty. The score counts recorded file metadata. Picture contents are held in memory only: reloading or leaving the workspace can remove the previews while saved filenames remain. Re-select files when you need to inspect them again. CertFlow does not upload these files or package them into the handoff export.
Track all twenty evidence items
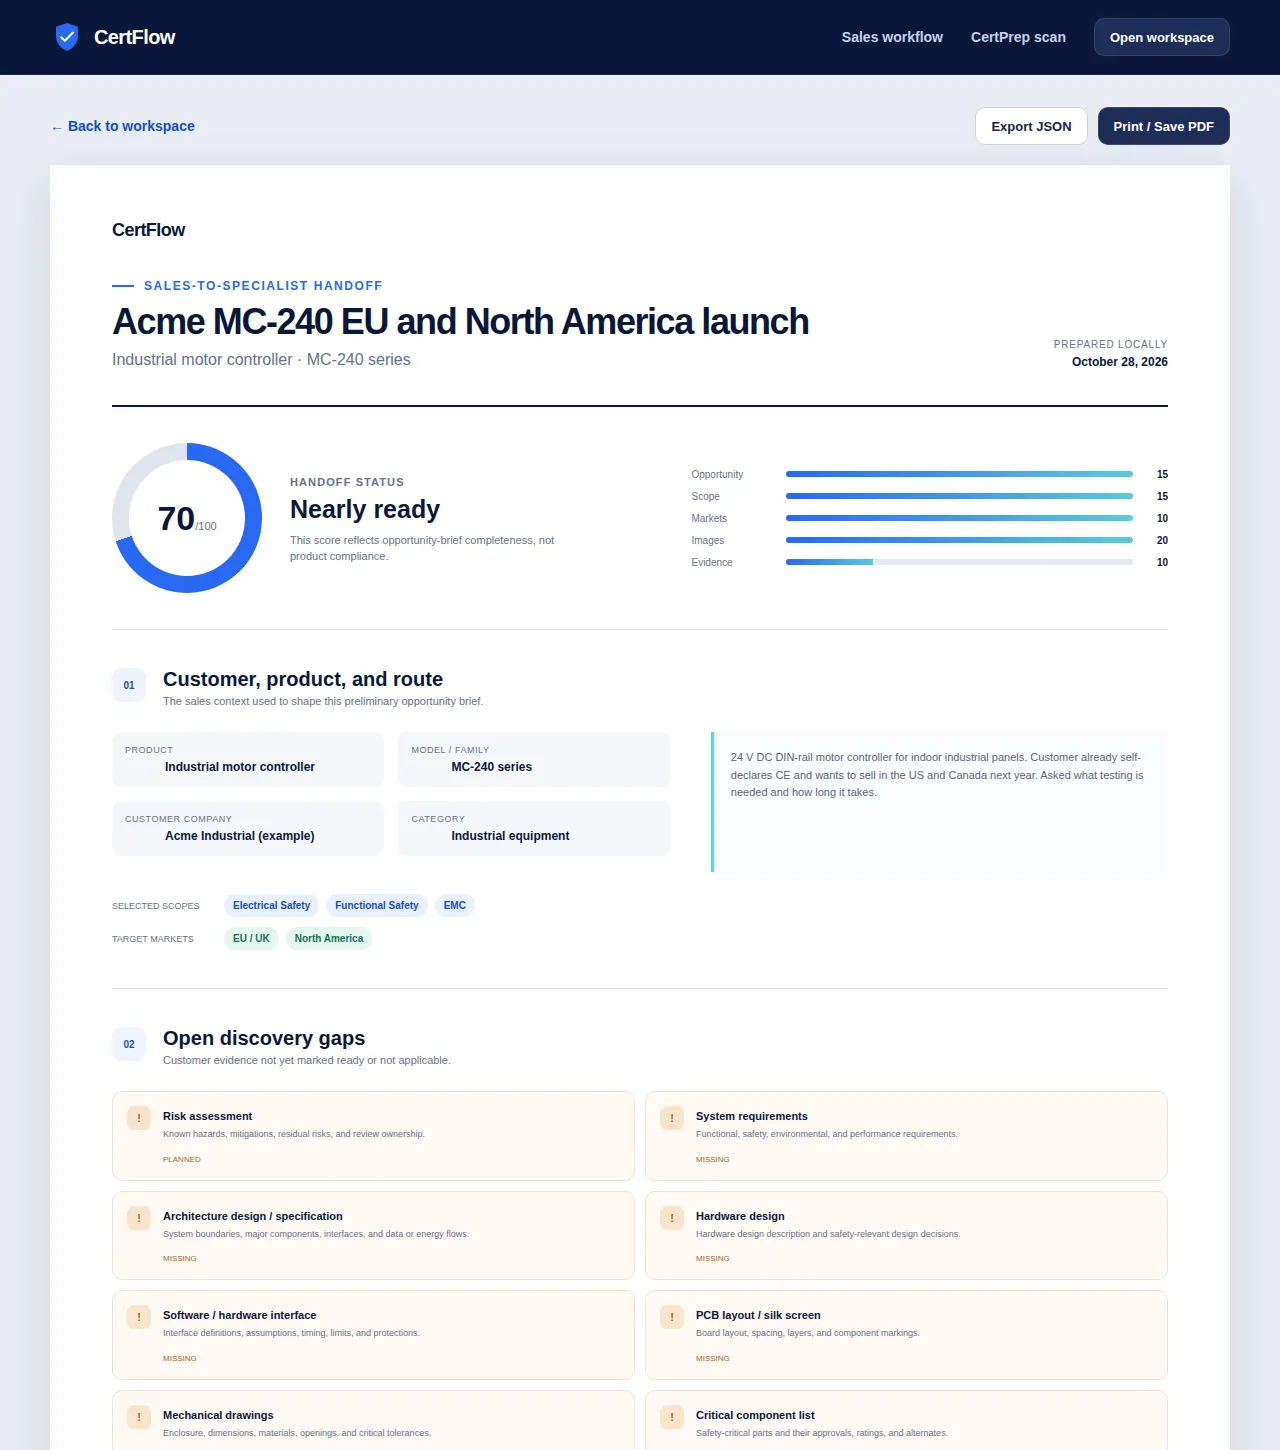
Open Evidence to record the customer's document position. Items marked Recommended are chosen from the selected scopes. The entire catalog remains visible so you can record other relevant material.
- Find the document row.
- Choose its status from the dropdown.
- Optionally choose Select file to record a local document's filename. Selecting a file also changes its status to Ready.
- Use Replace file if the selected document changes.
- Revisit recommended rows before preparing the handoff.
| Status | Meaning in the app |
|---|---|
| Missing | No usable evidence recorded; remains a handoff gap |
| Planned | Expected later; still remains a gap |
| Ready | Recorded as available; contributes to completeness |
| Not applicable | Excluded by your judgment; also counts as complete |
Not applicable raises the score just as Ready does. Use it only when you have a reason to exclude the item and explain the assumption to the reviewer.
| Evidence group | Catalog entries |
|---|---|
| Product and system | Product description / user manual; Risk assessment; System requirements; Architecture design / specification |
| Hardware | Hardware design; Software / hardware interface; Schematic diagram; Wiring diagram; PCB layout / silk screen |
| Software | Software requirements; Software architecture design; Software verification testing; Software / hardware integration testing; Software tools / coding standards |
| Validation and construction | Validation plan; Mechanical drawings; Bill of materials; Critical component list |
| Test and regulatory context | Test setup / instructions; Required standards / regulations |
The recommended ready counter includes both Ready and Not applicable. Choosing a local document records its name, size and type; its contents are not uploaded, checked or preserved. Send actual evidence through your normal customer-document process alongside the report.
Understand the handoff score and next actions
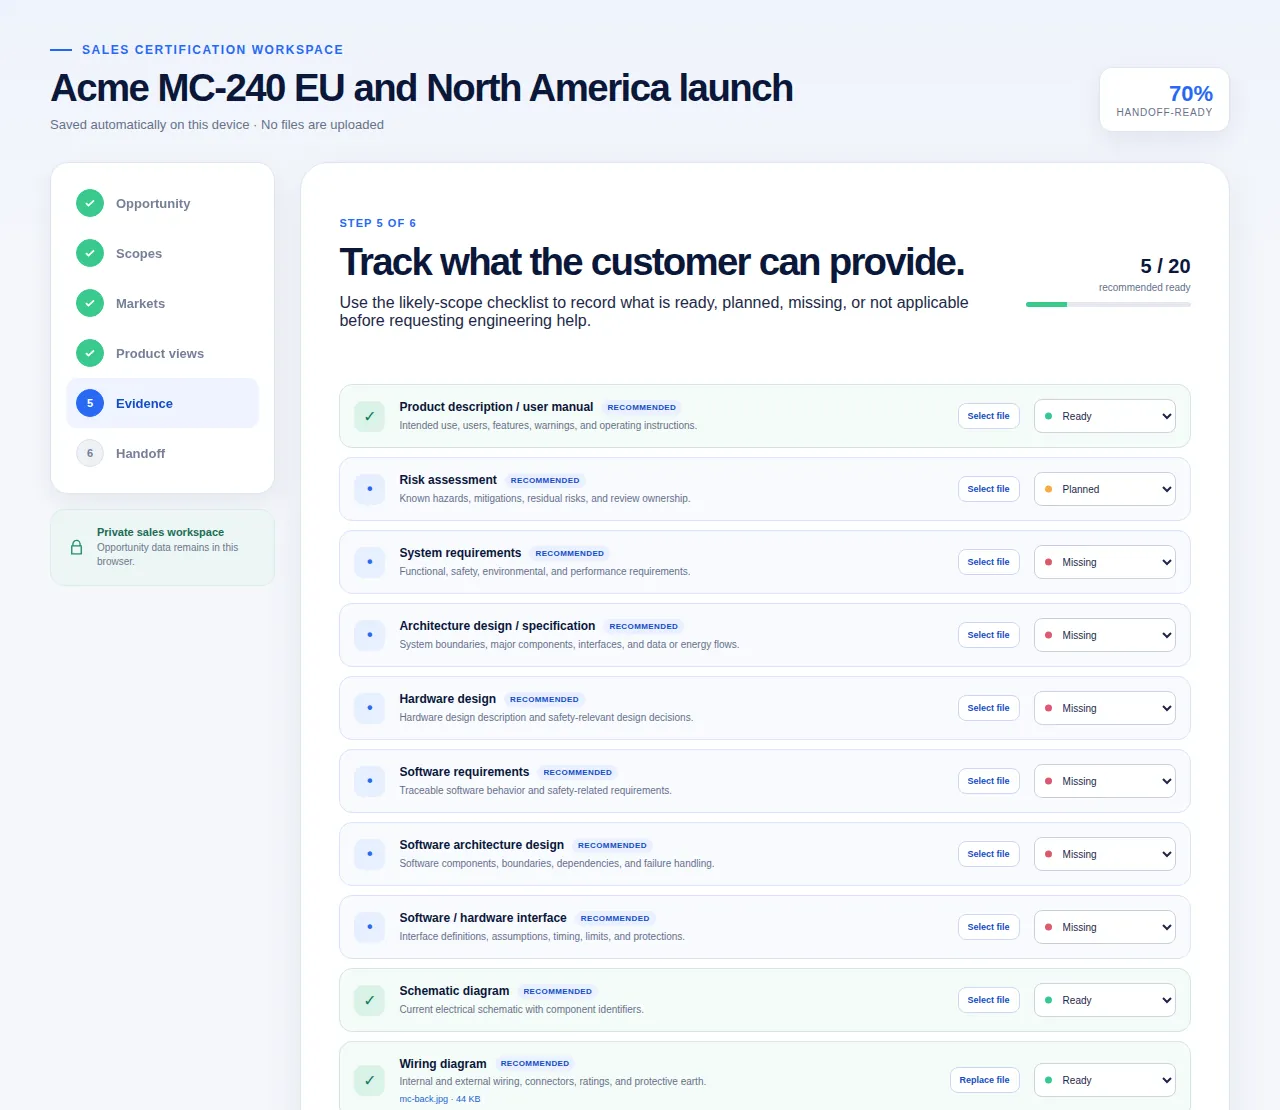
On Handoff, review the percentage, status, opportunity summary and Sales next actions. The app calculates the score locally from these five parts:
| Part | Maximum | How points are earned |
|---|---|---|
| Opportunity | 15 | Proportion of the six nonempty text/category fields |
| Scope | 15 | At least one scope selected |
| Markets | 10 | At least one market selected |
| Product views | 20 | Five per recorded view |
| Evidence | 40 | Proportion of recommended items Ready or Not applicable |
The rounded total maps to Starting below 30, Developing from 30, Nearly ready from 60 and Ready for specialist handoff from 80. A high number says the brief is organized, not that the product has passed tests.
Next actions respond to gaps: missing scopes, markets, views or recommended evidence create requests for more information. Functional Safety adds a lifecycle and traceability prompt; Hazardous Locations adds zone/class and related questions. At 80 or above, the app suggests a focused specialist review. These are deterministic suggestions based on entries, rather than a technical assessment of the selected files.
Print, export, update and clear the handoff
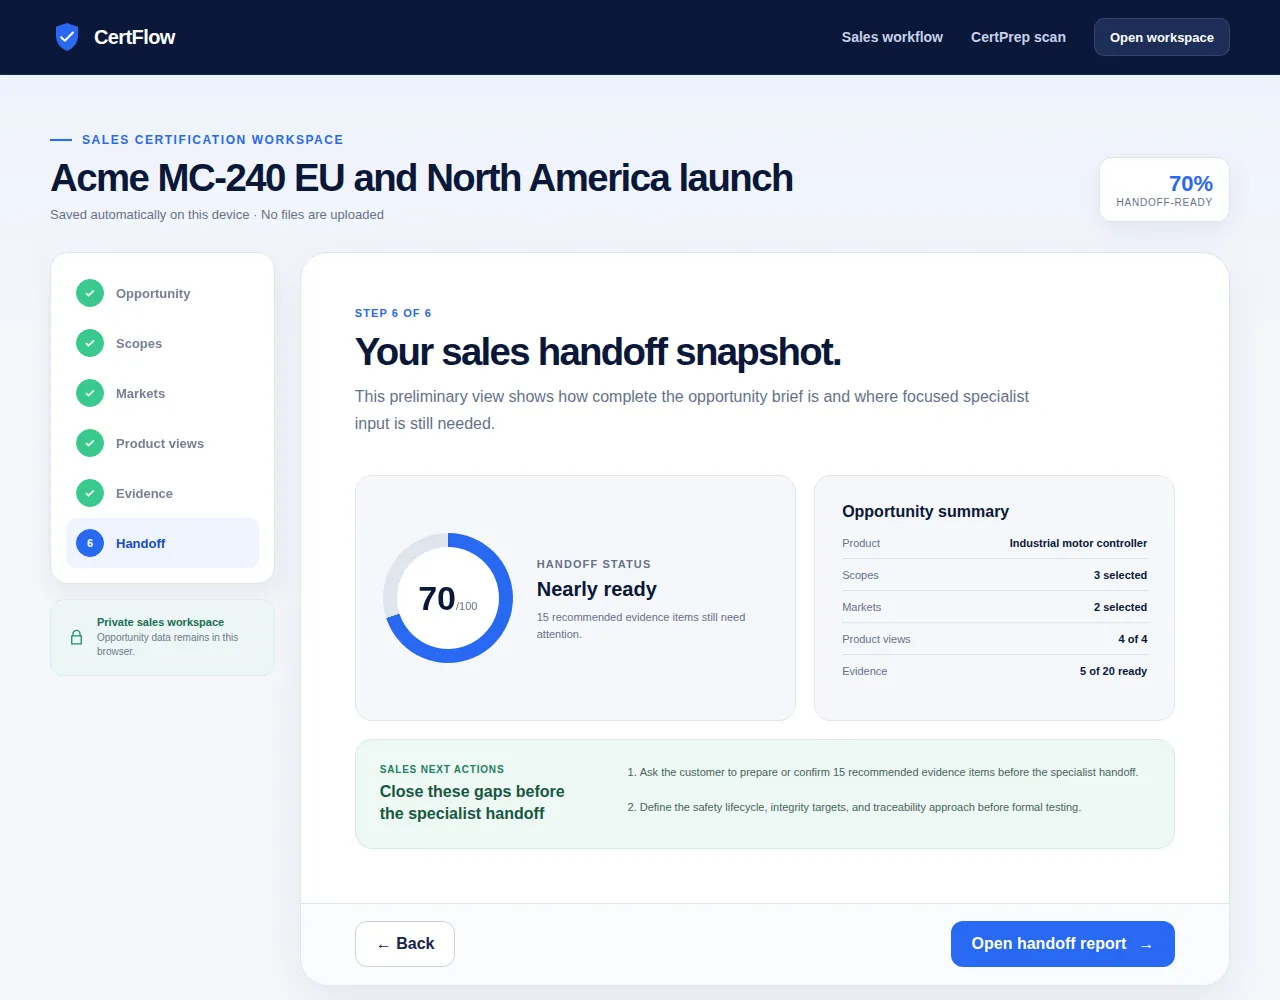
- Choose Open handoff report from the last step.
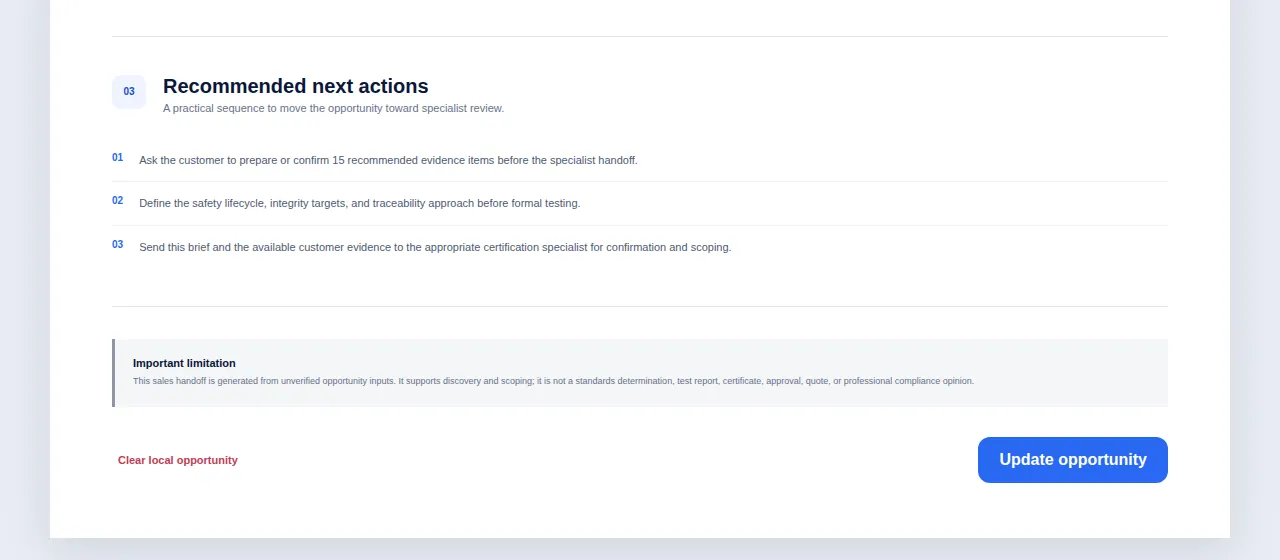
- Review Customer, product, and route, Open discovery gaps and Recommended next actions.
- Choose Print / Save PDF to use the browser's print dialog. Select its PDF destination to save a document.
- Choose Export JSON to download the opportunity data and calculated score as a structured snapshot.
- Choose ← Back to workspace or Update opportunity to revise the same draft.
The report includes a score breakdown, selected scopes and markets, product details, outstanding evidence and the planning limitation. Neither PDF nor JSON includes the selected document binaries or a portable photo archive. There is no JSON import control in the main workspace, so do not assume the export can restore a cleared draft.
Clear local opportunity asks for confirmation, removes the saved opportunity from this browser and returns home. Export anything needed before confirming. This affects CertFlow's local draft; it does not delete a CertPrepare account or scan history.
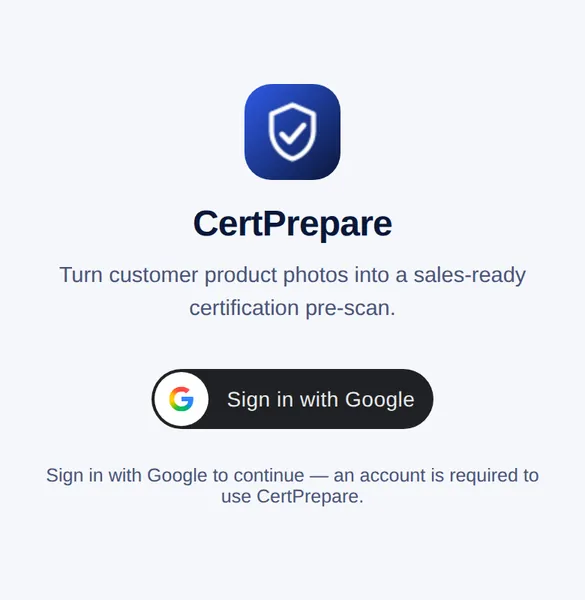
Sign in to CertPrepare and prepare pictures
CertPrepare is the app name on the companion's sign-in screen and installation manifest. The main CertFlow navigation calls it CertPrep.
- Open CertPrepare.
- Choose Sign in with Google. First sign-in registers an account.
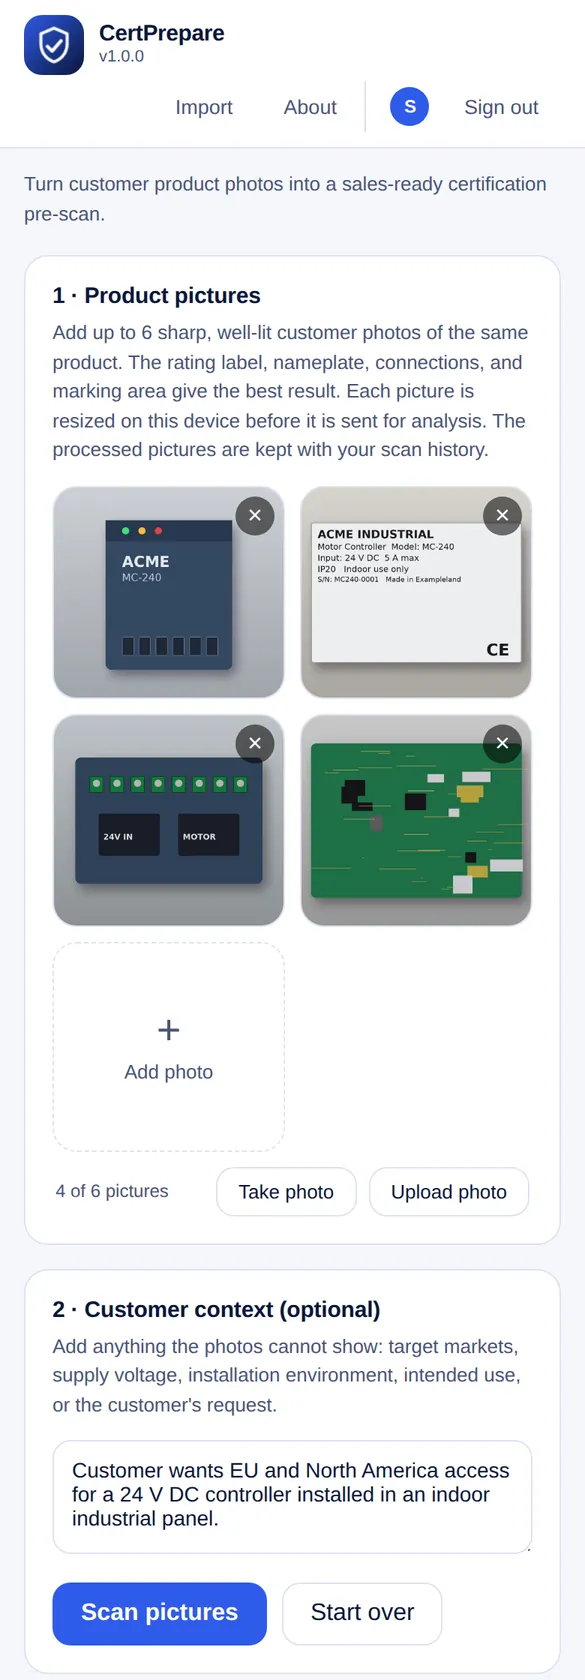
- Choose Take photo for the phone camera, Upload photo for gallery/files, or drop images on the desktop picture area.
- Add up to six clear photos of the same product. Put the most useful identifying picture first, normally its label or nameplate.
- Remove a wrong image with its remove control. Add a front/back view, connectors and internal construction when helpful.
- Add Customer context (optional): target markets, supply voltage, environment, intended use and the customer's request.
The browser resizes images to at most 1280 pixels and re-encodes them as JPEG before submission, stripping the original metadata. The processed images still contain everything visible in the photo. Check the image itself for confidential labels or customer information before uploading.
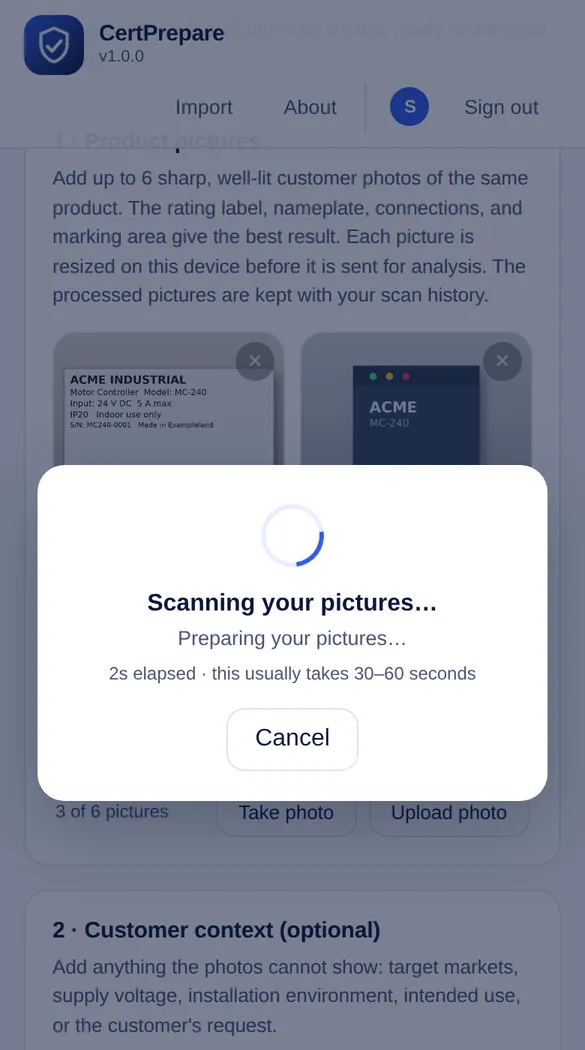
Scan, cancel and read a result
Choose Scan pictures. A blocking progress overlay shows phase text and elapsed time; the underlying page is temporarily unavailable. Cancel stops waiting for the request. Processing time depends on the service and images; the display is guidance rather than a completion guarantee.
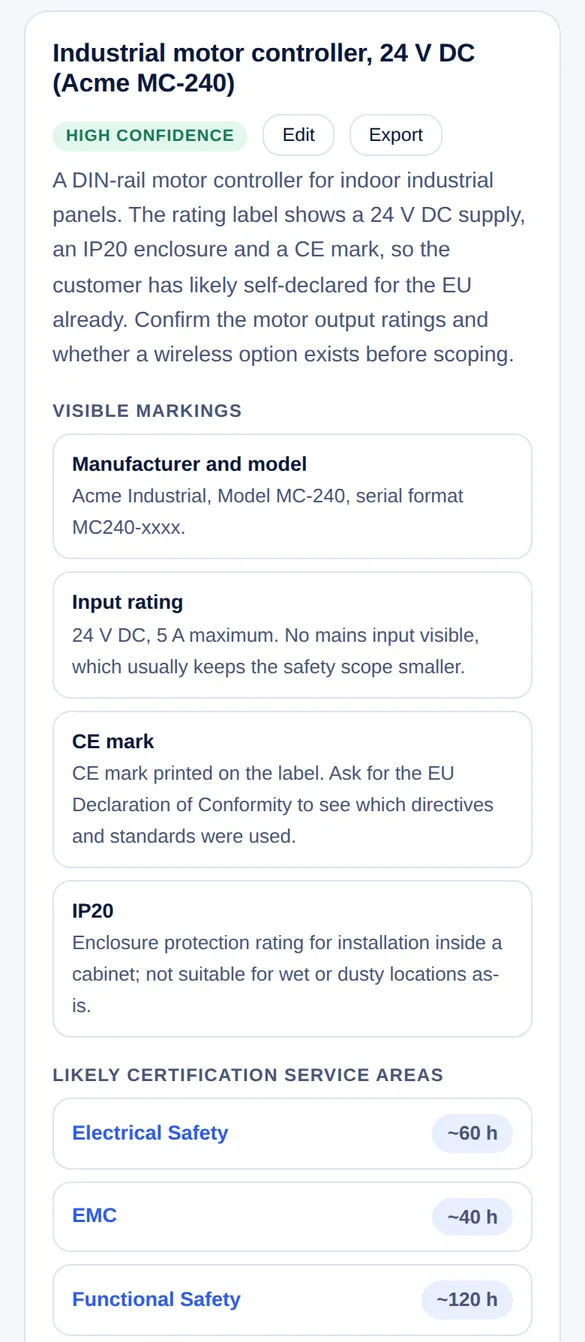
The result contains:
| Area | How to use it |
|---|---|
| Product title and summary | Check that the assistant understood the product and its use |
| Confidence | Low, medium or high confidence in the photo-based interpretation |
| Visible markings | Compare extracted models, ratings and marks with the photographs |
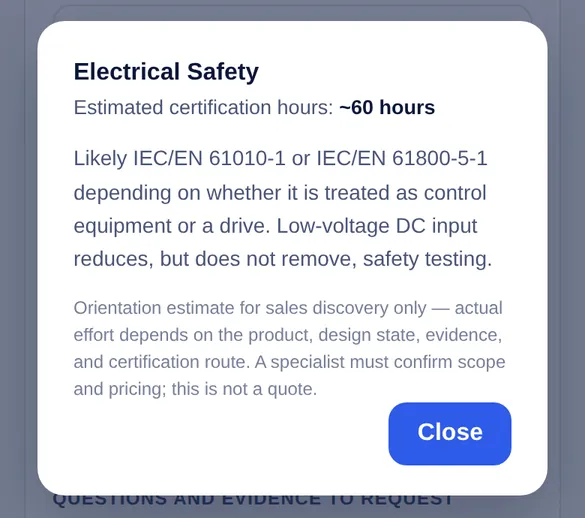
| Likely certification service areas | Open a scope name for its explanation and indicative hours |
| Questions and evidence to request | Turn gaps into customer follow-up questions |
| Sales next steps | A practical order for the next conversation and specialist handoff |
Selecting a scope opens a detail dialog. Its estimated hours are orientation estimates for that proposed scope; they are not a quote or a guaranteed total. Close the dialog to return to the result. Use the customer evidence to confirm or correct the findings before passing them on.
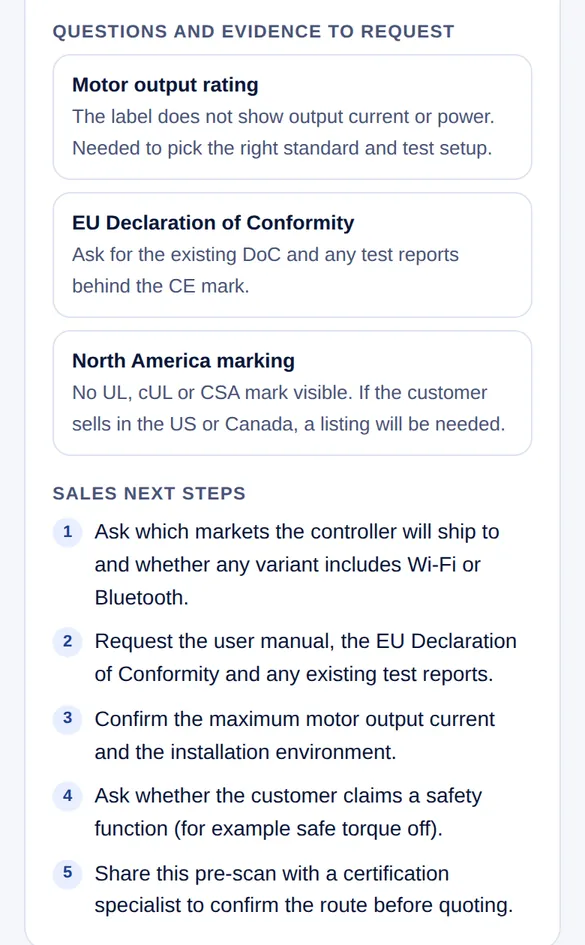
Start over clears the current input/result view for another product; saved history remains. To change markets or context and request a fresh interpretation, select photos again as necessary and use Scan again.
Handle duplicate pictures and saved results
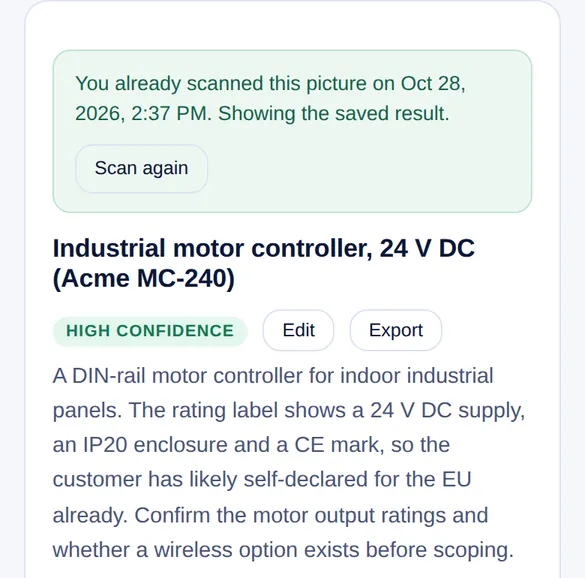
The service checks the first photo against saved history. Identical and visually similar versions can return a previously saved result. The green message You already scanned this picture… Showing the saved result means the service reused history instead of producing a fresh analysis.
Choose Scan again to force a new request when the other photos, customer context or required interpretation changed. Merely adding more angles while keeping the first photo may still hit the saved result. Duplicate matching is a convenience; compare the returned product and details with the current request.
Edit a scan and its findings
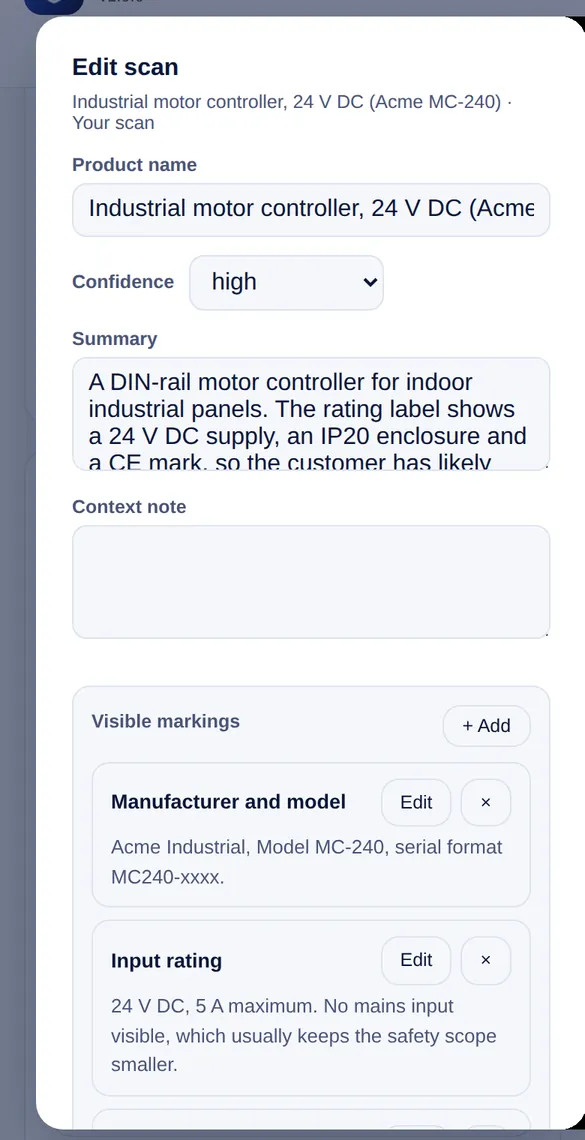
- Open a saved result, then choose Edit.
- Update Product name, Confidence, Summary and Context note.
- In Visible markings, Likely certification scopes or Missing or unclear evidence, use Add, Edit or the remove control for individual findings.
- Edit each finding's label and detail; scope findings can carry estimated hours.
- Add, edit or remove individual next steps.
- Choose Save changes to persist the revised result, or Cancel to discard the draft.
The editor allows up to eight entries in each findings/next-steps group. Editing corrects the saved interpretation; it does not run the AI again. A user can edit their own stored scans. Tags belong to the administrative data editor.
Use Recent scans, export, import and delete
Recent scans shows saved product thumbnails, titles, confidence and times. Select a row to reopen its stored result and processed photos. History is account-based and requires the server. Existing legacy records without an owner can also be visible to signed-in users.
To transfer results:
- Use Export on a result, or its history row's export control, to download JSON.
- For several scans, choose Select, check rows or Select all, then Export (n). Multiple selections create a collection file.
- Choose Done to leave selection mode.
- Choose Import and select a compatible result/collection JSON to view it.
Import is a viewer: it does not restore an entire collection into server history. For a collection, the app explicitly says That file holds … scans. Showing the first one. Imported results may also refer to pictures still hosted by the original server, so retain access to that server if those references are needed.
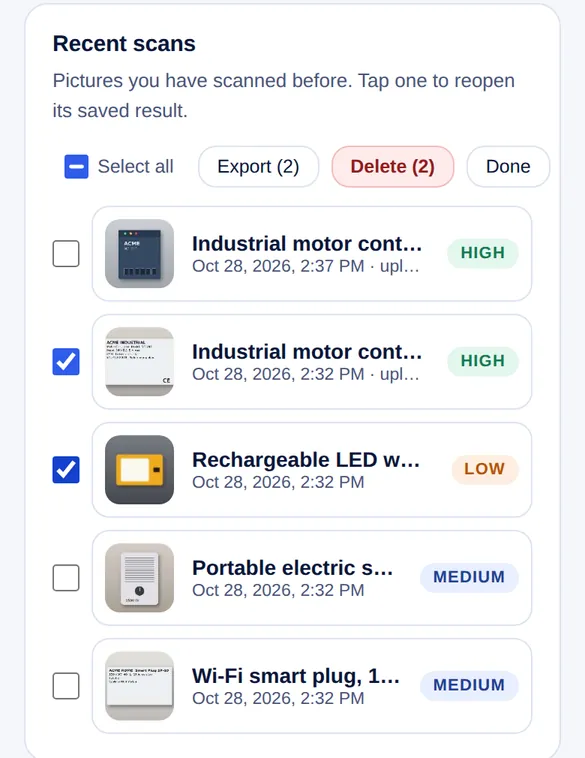
Use a row's delete control, or Select → Delete (n), to remove saved history after confirmation. Deletion cannot be undone in the interface. Start over, Sign out, and deleting a record have different effects: the first clears the current view, the second removes this browser's session, and the third removes stored history.
Manage users, data and settings
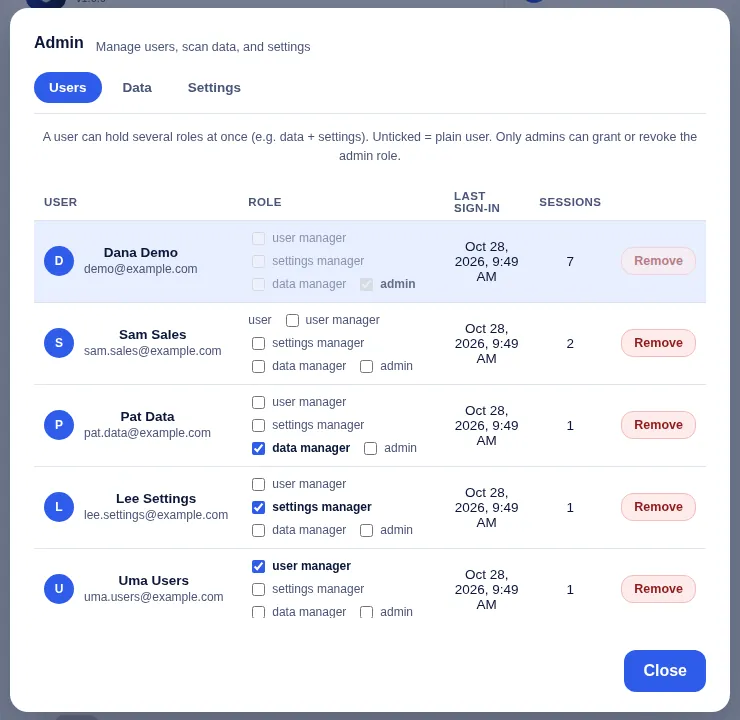
The Admin button appears only for accounts with an administrative or manager role. Its tabs follow the account's permissions.
| Role | Available area |
|---|---|
| Plain user | Own scans; no administration panel |
| User manager | Users |
| Data manager | Data |
| Settings manager | Settings |
| Admin | All three areas and authority to grant/revoke admin |
Users
Open Admin → Users. Review names, roles, last sign-in and session counts. Toggle the per-role checkboxes to change a user's permissions. A user can hold more than one manager role. Remove deletes the user and their scans. Managers cannot edit their own roles or an administrator's roles, and only administrators grant or revoke admin access.
Data
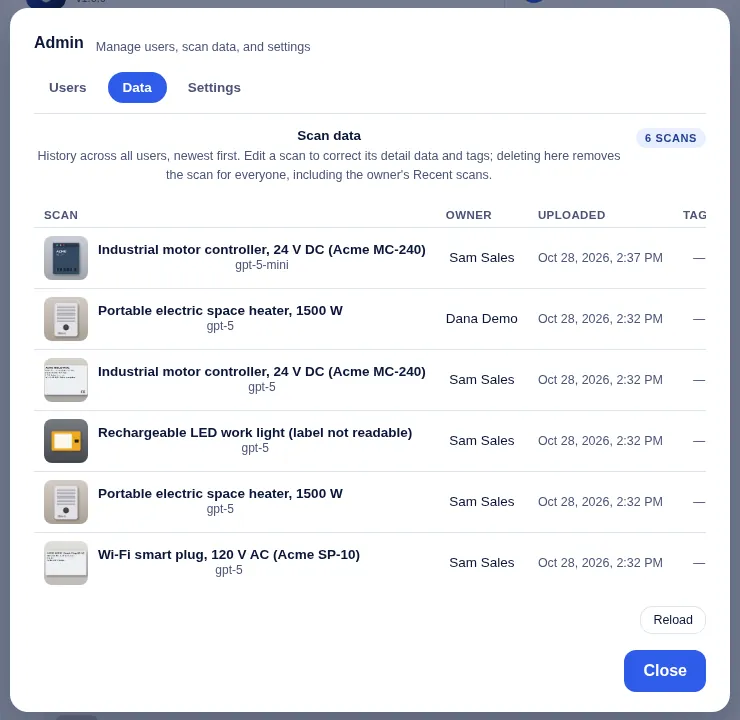
Open Data to review scans across all users, including owner, model, upload date and tags. Use Edit to correct the saved result and comma-separated tags, then Save changes. Deleting here removes the record for everyone, including its owner. Reload refreshes the list; additional records can be loaded when available.
Settings
Open Settings to see the current AI configuration and stored key/value entries. Update an existing value and choose Save, or enter a new key/value and choose Add. Remove, or saving an empty value, removes the override so the built-in/environment default can apply. The AI model override affects new scans; it does not recompute existing results. The API key status indicates configuration without displaying the key itself.
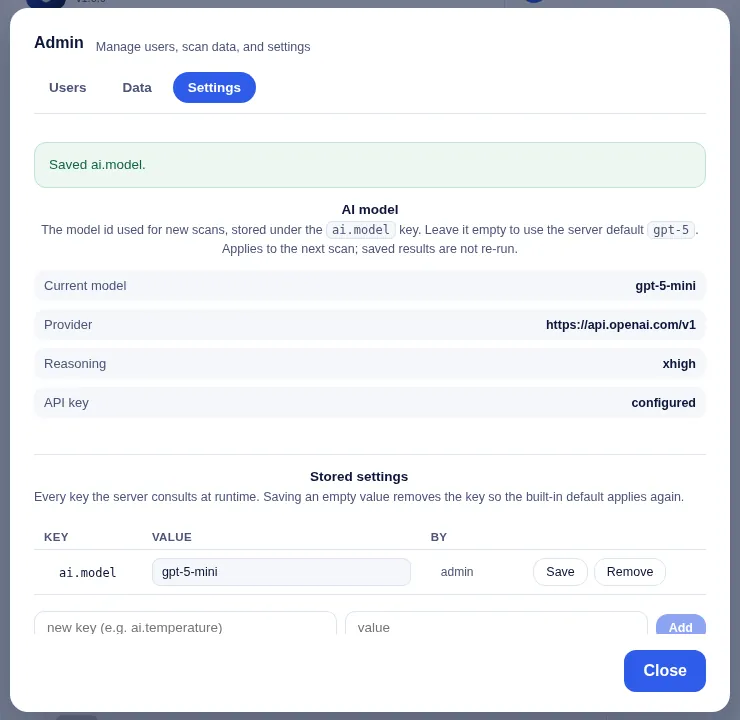
Generic keys should only be changed when the operator knows the application uses them. Adding an arbitrary name does not create a new feature.
Mobile, installation, offline use and privacy
On phones, the workspace stepper becomes a compact numbered strip. CertPrepare's camera action is convenient for a customer visit, and long results scroll vertically. You can install each web app through the browser's install menu; on iPhone use the Share menu's Add to Home Screen when available. There is no native store listing in the reviewed source.
The CertFlow app shell can be cached after the first online load. Ready offline indicates that local availability; An update is ready → Refresh loads a newer version. Offline caching does not make CertPrepare's account, scanning or history available without the server. About in CertPrepare shows version/build information that is useful when reporting an issue.
CertFlow's browser draft is device-specific. Clearing site data, using another browser or replacing the device does not move it. Photo/document previews are temporary. CertPrepare has different privacy behavior: processed pictures, context and results go to its service and analysis provider, and stored scans can be administered. Sign out on a shared device and export the records you need before deleting them.
Troubleshooting
| Problem | What to check or do |
|---|---|
| Complete the required selection | Fill Opportunity name and Product name, select at least one scope, or select at least one market for the current step |
| Score drops after changing a scope | The recommended evidence list and its denominator changed; review newly recommended rows |
| Saved filenames but no picture preview | File contents are not persisted in the workspace. Re-select the photos |
| Export has filenames but no documents | Expected: send the actual evidence separately |
| Need to restore a cleared opportunity | There is no main-workspace JSON import control; avoid clearing before retaining the report/details |
| Google sign-in does not load | Check network access, browser blocking and the operator's Google sign-in configuration |
| A scan accepts up to 6 pictures | Remove extra images; keep the set to one product |
| Unreadable image or preparation error | Try a standard JPEG/PNG image; make ratings sharp and well lit |
| Result did not change with new context | A first-photo duplicate may have reused history. Use Scan again |
| Scan cancelled | The request was cancelled; choose photos and scan again when ready |
| Scan fails or never completes | Retry with clear, smaller pictures and check connectivity; the operator should check the analysis service configuration |
| Import displays only one scan | Collection import currently opens only the first result; it is not a bulk restore |
| No Admin button or missing tab | The signed-in account lacks the corresponding role |
| Missing saved picture | The record may refer to unavailable server media; retain the original customer images separately |
For a support report, include the action, exact error and About build information. Describe which tool you used—CertFlow workspace or CertPrepare—because their storage, sign-in and exports differ.